How to Make Dangle Earrings with Beads: A Complete Guide for Beginners and Crafters
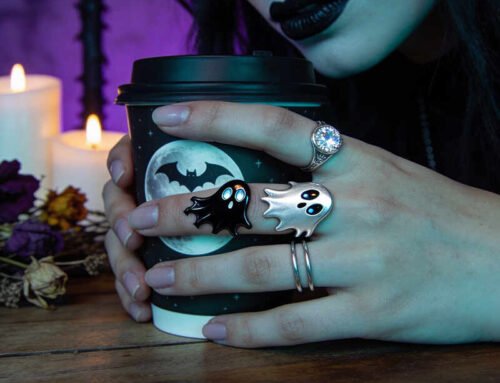
Creating your own jewelry is a rewarding and creative hobby that anyone can learn, regardless of their experience level. Among the most popular DIY jewelry projects, dangle earrings with beads stand out as both elegant and achievable. Whether you’re looking to craft a unique gift, express your personal style, or even start a small jewelry business, this comprehensive guide will walk you through every step of the process. From selecting the right materials to mastering advanced techniques, you’ll discover that making beautiful dangle earrings is easier and more enjoyable than you might imagine.Are dangling earrings attractive?Yes,dangle earrings are absolutely gorgeous! They sway gracefully with every step, outlining the elegant lines of your neck, both flattering your face shape and adding a touch of lively charm. Whether it’s a simple delicate chain or beads, they can elevate your style and make your overall outfit more sophisticated.
Why Make Your Own Dangle Earrings?
Before we dive into the technical aspects, let’s explore why so many people are drawn to creating their own beaded dangle earrings. The first and most obvious reason is cost savings. Store-bought earrings, especially those made with quality materials and unique designs, can be surprisingly expensive. By making your own, you can create sophisticated pieces for a fraction of the retail price. A pair of store-bought beaded dangle earrings might cost $25-$50 or more, while you can create similar pieces for just $3-$8 in materials.
Beyond affordability, handmade jewelry offers unparalleled personalization. You choose every color, bead size, and design element, meaning you can create pieces that perfectly match your wardrobe or reflect your unique aesthetic. This customization extends to practical considerations as well—you can select hypoallergenic materials if you have sensitive ears, choose lightweight beads if you prefer comfort over statement pieces, or create designs specifically for occasions, holidays, or as meaningful gifts for loved ones.
The creative satisfaction of wearing something you’ve made with your own hands cannot be overstated. There’s a special pride in receiving compliments on earrings you crafted yourself, and the meditative, focused nature of bead work provides stress relief and mindfulness benefits that many crafters cherish.
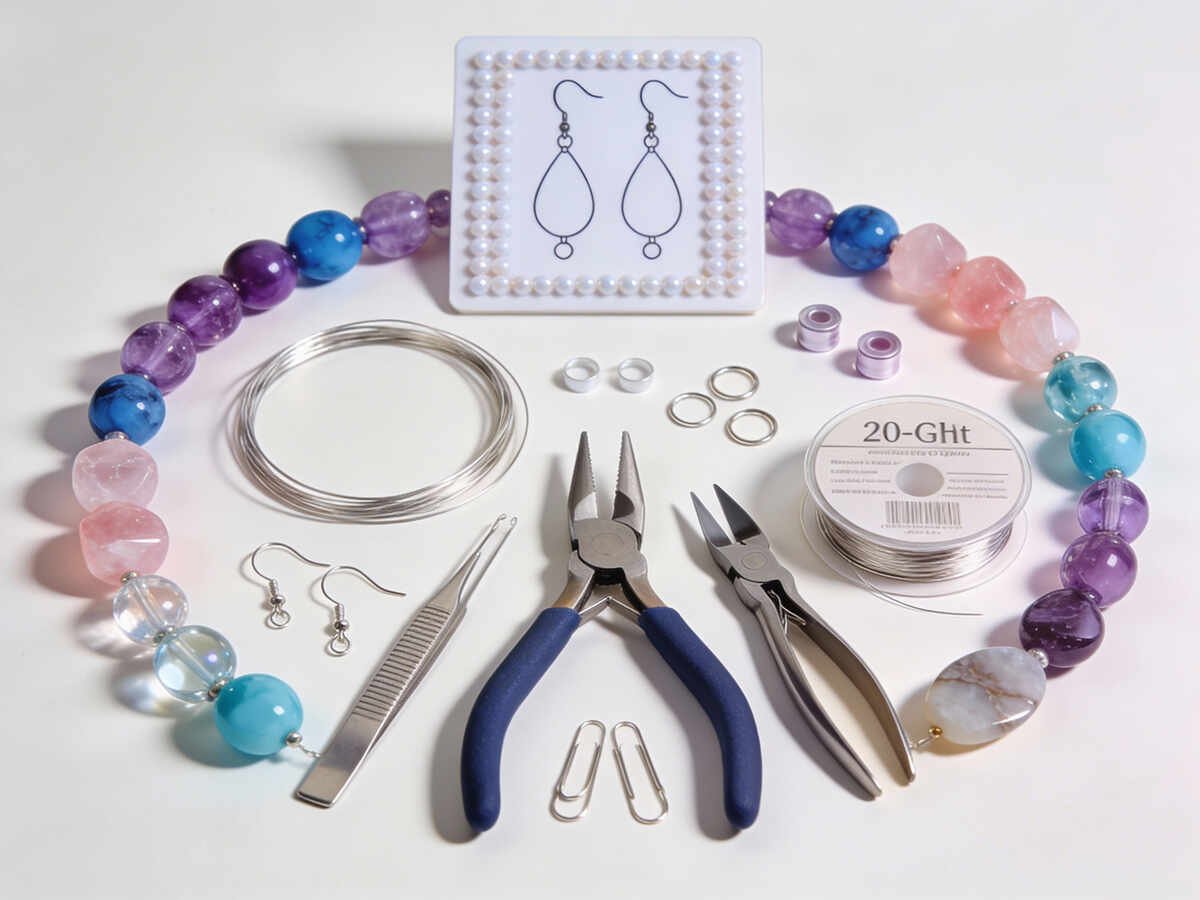
Essential Materials and Tools
Successful bead work begins with understanding your materials and having the right tools on hand. Let’s break down everything you’ll need to get started.
Beads
Beads form the foundation of your dangle earrings and come in numerous varieties. Glass beads are perhaps the most popular choice for beginners. They’re affordable, come in virtually every color imaginable, and offer excellent clarity and finish. Within the glass category, you’ll find faceted beads that catch and reflect light beautifully, seed beads for detailed designs, and larger decorative beads for focal points.
Semiprecious stone beads
offer a more upscale aesthetic. Options like amethyst, rose quartz, turquoise, and jasper bring natural variation and elegance to your designs. While more expensive than glass, stone beads create sophisticated, bohemian pieces that rival professional jewelry.
Pearl beads
whether freshwater, saltwater, or shell pearls, add classic elegance. Metallic and crystal beads provide sparkle and shine, while ceramic and wood beads offer interesting textures and boho appeal. For your first projects, starting with glass beads allows you to practice technique without significant financial investment.
Wire, Thread, and Findings
The materials connecting your beads are equally important. Beading wire, typically made from stainless steel or bronze core with a nylon coating, comes in various gauges. 20-gauge wire is ideal for beginners as it’s easy to manipulate while remaining sturdy. Beading thread alternatives include nylon thread, which is durable, and waxed thread for a vintage aesthetic.
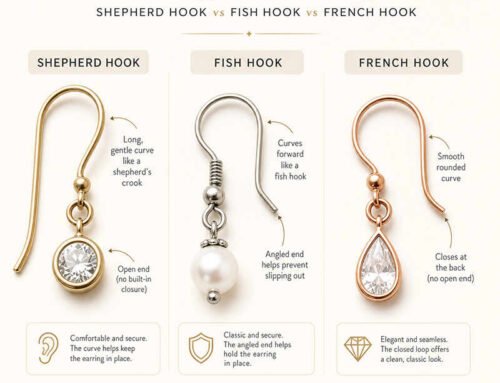
Findings are the metal components that complete your earrings. Essential findings include earring posts (for stud conversions), earring hooks (for dangling pieces), jump rings (for connecting components), and bead caps (decorative elements that enhance your design).
Tools
Quality tools make the entire process smoother and more enjoyable. Round-nose pliers create loops in wire, while flat-nose pliers help you bend wire and open/close jump rings. Many crafters prefer chain-nose pliers as a more versatile alternative. Wire cutters are essential for clean cuts without fraying. A bead board helps you visualize your design before assembly, and scissors for thread work are necessary. For more advanced techniques, consider crimping tools for secure connections and a bead spinner for efficiently stringing multiple beads.
Design Fundamentals
Before making any beads, understand these core design principles that distinguish professional-looking earrings from amateurish attempts.
Color Theory
Monochromatic designs use various shades of a single color—perhaps several blues from navy to sky blue. These create sophisticated, cohesive looks. Complementary color schemes pair colors opposite on the color wheel (blue and orange, red and green), creating striking contrast. Analogous schemes use colors next to each other on the color wheel (blue, blue-green, green) for harmonious, restful aesthetics.
For beginners, limit your designs to no more than three primary colors. This restraint prevents visual chaos while allowing creative expression. Consider how your earrings will coordinate with typical outfits—earthy tones, jewel tones, or metallics offer versatility.
Bead Selection and Proportion
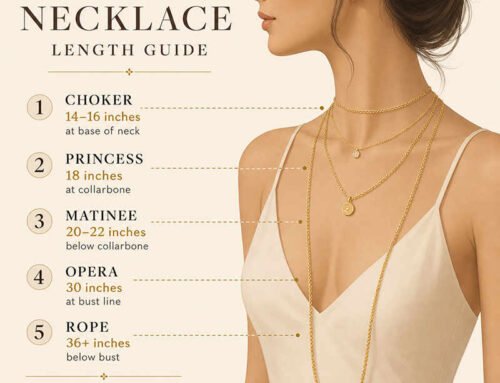
The visual weight of your design matters significantly. A common mistake is making earrings too heavy at the bottom, which strains earlobes and looks unbalanced. A well-proportioned dangle typically measures 1.5 to 2 inches in total length, with the focal point (largest or most decorative element) positioned roughly in the middle or slightly toward the bottom.
Mixing bead sizes creates visual interest. Use small accent beads (2-4mm) to transition between larger elements (6-8mm focal beads). Alternate bead shapes—perhaps round beads interspersed with faceted or barrel-shaped beads—adds dimension without overwhelming the design.
Step-by-Step Instructions for Your First Pair
How to make homemade dangle earrings?Now that you understand materials and principles, let’s create a basic but elegant pair of beaded dangle earrings.
The Simple Wire Wrap Method
For Your First Pair, You’ll Need:
-
2 earring hooks
-
4 round glass beads (8mm)
-
4 small seed beads (3mm)
-
24 inches of 20-gauge beading wire
-
Round-nose and flat-nose pliers
-
Wire cutters
Step One: Prepare Your Wire
Cut two pieces of 20-gauge wire, each 6 inches long. This length provides enough material to create loops while ensuring enough remaining wire for stringing beads. Place your first piece in front of you.
Step Two: Create the Loop
Using your round-nose pliers, grip the end of the wire about half an inch from the tip. Rotate your wrist to form a small loop. This loop will eventually attach to your earring hook. The size of this loop should match the opening of your earring hook—typically about the diameter of the pliers’ thinnest section. Don’t worry if your first loop isn’t perfect; this skill improves rapidly with practice.
Step Three: String Your Beads
On the long end of the wire (the end without the loop), thread one small seed bead, followed by one large glass bead, followed by another small seed bead. Push these beads up toward the loop, ensuring they sit neatly on the wire without gaps.
Step Four: Create the Bottom Loop
At the remaining end of your wire, create a second loop using the same round-nose pliers technique. This bottom loop doesn’t attach to anything but creates a secure endpoint preventing beads from sliding off. Make sure this loop is sized similarly to the top loop.
Step Five: Trim Excess Wire
Using wire cutters, carefully trim any protruding wire after your bottom loop. Be careful not to cut the loop itself. The goal is clean edges with no sharp wire remaining.
Step Six: Attach to Earring Hook
Open the earring hook’s loop slightly by rotating it horizontally (not spreading it open, which weakens the connection). Slide your bead-laden wire loop onto the hook’s loop. Rotate the hook to close it securely. The beads now hang from the hook.
Step Seven: Repeat
Create an identical second earring following all the above steps. Matching is important, so use the first earring as a reference for bead placement and loop size.
Congratulations! You’ve created your first pair of dangle earrings. While simple, this design demonstrates all fundamental techniques you’ll use for more complex pieces.
Intermediate Techniques for More Complex Designs
Once you’ve mastered the basic wire wrap method, expand your skills with these intermediate approaches.
The Beaded Chain Method
This technique creates longer, more elaborate dangles by stringing beads on thread or wire, then connecting them to earring findings.
Use beading wire or thread to create a strand of beads—perhaps alternating colors or sizes. Attach one end of this strand to an earring post or wire finding using a crimp bead or wire wrap. The beads hang freely from this connection point, creating an elegant cascade effect. This method allows for longer designs (up to 3 inches) and more elaborate bead combinations.
Jump Ring Connections
Jump rings allow you to combine separate beaded elements into complex designs. For example, create three separate beaded segments—a top decorative component, a middle focal point, and a bottom tassel-style element—then connect them using jump rings to create a sophisticated three-tier dangle.
To connect elements with jump rings, open the ring slightly by rotating one end forward and one end backward (never spread it open). Slip it through both the element you’re connecting and the jump ring it’s attaching to, then rotate back to close. This technique opens endless design possibilities.
Incorporating Seed Bead Details
Seed beads offer surprising versatility. String them onto thread or wire to create decorative accents, texture, or fringe effects. A fringe technique—where multiple strings of seed beads dangle from a central bead or finding—creates movement and catches light beautifully.
Advanced Design Ideas
For experienced crafters ready to challenge themselves, consider these sophisticated approaches.
Mixed Media Combinations
Combine different material types in single earrings: pair glass with wood beads, mix semiprecious stones with metal accents, incorporate vintage beads with modern findings, or blend beads with small charms or pendants. These combinations create unique, gallery-quality pieces.
Gemstone and Pearl Designs
Upgrade to semiprecious beads for elegant, luxurious pieces. Amethyst pairs beautifully with silver findings, rose quartz creates romantic pieces, and turquoise offers bohemian appeal. Natural stone variations mean no two pairs are identical, adding to their charm.
Chandelier and Waterfall Styles
These dramatic styles feature multiple strands of varying lengths creating a cascading effect. While technically more demanding, they produce show-stopping results. Start with three strands decreasing in length, connected at the top to a single earring finding.
Troubleshooting Common Problems
Even experienced crafters encounter challenges.How to attach dangling beads? Here are solutions for frequent issues.
Beads Keep Sliding Off: Your wire might be too thin, or you’re not creating secure enough loops. Try using thicker wire (18-gauge) or add tiny bead caps on either side of beads to keep them in place.
Wire Is Too Difficult to Bend: You might be using overly thick wire for your hand strength, or your wire might be work-hardened. Try thinner wire, or invest in quality jeweler’s pliers that provide better leverage.
Earrings Feel Heavy or Uncomfortable: Remove some beads or switch to lighter materials like hollow beads or acrylic options instead of glass or stone. Proportionally, aim for earrings under half an inch in width and one to two inches in length.
Loops Keep Bending or Breaking: You might be applying too much pressure or reopening them too many times. Use smooth, decisive motions, and practice on spare wire before working with findings.
Inconsistent Bead Holes: Check that your wire or thread isn’t catching on bead imperfections. Use a bead reamer to smooth rough holes if necessary, or simply move to a different bead.
Sourcing Quality Supplies
Your materials significantly impact your final product. Local bead shops offer hands-on browsing, immediate acquisition, and expert advice. Online retailers provide selection, competitive pricing, and convenience. Reputable options include dedicated jewelry supply websites, craft marketplaces, and established retailers.
When selecting suppliers, prioritize:
-
Honest product descriptions including accurate bead sizes and material composition
-
Good lighting and clear photos so you see actual colors
-
Return policies in case materials don’t meet expectations
-
Reasonable shipping costs and times
-
Customer reviews confirming product quality
Taking Your Craft Further
Once you’ve mastered basic dangle earrings, numerous paths forward exist. Create coordinating jewelry sets by making matching necklaces and bracelets. Develop signature styles that become recognizable as yours. Share your work on social media, building an audience and potential customer base. Explore other jewelry forms like brooches, hair clips, or rings using similar techniques.
Some crafters eventually transition to selling their work, either through online platforms like Etsy, at craft fairs, or through boutique consignment. Others maintain bead work as a personal hobby providing stress relief and creative fulfillment. Both paths offer genuine rewards.
Final Thoughts
Creating dangle earrings with beads is a skill that combines artistic expression, technical precision, and creative problem-solving. Your first pair might not be perfect—few people’s are—but each successive creation improves. The joy of crafting comes not from achieving flawless results immediately but from the journey of learning, practicing, and gradually developing your unique style.
Whether you seek a relaxing hobby, an affordable way to build a jewelry wardrobe, or even entrepreneurial opportunity, bead work welcomes all skill levels. You need minimal startup investment, just a few basic tools, and the willingness to dedicate a few hours learning fundamental techniques. The combination of beautiful results, affordability, creative satisfaction, and stress-relieving focus makes dangle earring creation an activity anyone can enjoy.
Start today with that simple first pair using basic glass beads and wire. Let your fingers learn the feel of tools, your eyes develop an understanding of color and proportion, and your confidence grow with each completed design. You’re beginning a creative journey that can provide lifetime enjoyment, whatever direction you choose to take it.
FAQ Sections
FAQ 1: What Is the Best Wire Gauge for Making Dangle Earrings with Beads?
Explains that 20-gauge wire is ideal for beginners, with guidance on when to use thicker (18-gauge) or thinner (22-24 gauge) wire for different projects.
FAQ 2: Can I Use Regular Sewing Thread Instead of Beading Thread?
Discusses why specialized beading thread outperforms regular sewing thread in durability, fraying resistance, and longevity.
FAQ 3: How Do I Know What Size Beads to Buy for Dangle Earrings?
Provides detailed size recommendations: 2-3mm seed beads for accents, 4-6mm for secondary focal points, 8-10mm for primary focal beads, and guidance on creating balanced proportions.
FAQ 4: What’s the Difference Between Seed Beads and Accent Beads?
Clarifies that seed beads serve supporting roles while accent beads draw attention, explaining how the same bead can function differently depending on design context.
FAQ 5: How Can I Make My Dangle Earrings More Comfortable to Wear?
Offers five practical solutions: reducing bead quantity, switching to lighter materials, shortening length, using lightweight hooks, and considering ergonomic design principles.
FAQ 6: What Should I Do If Beads Keep Falling Off My Wire?
Identifies common causes (insufficient loops, inappropriate wire gauge) and solutions (bead caps, stop beads, methodical assembly approach).
FAQ 7: Can I Make Dangle Earrings with Beads Without Pliers?
Acknowledges alternatives like thread-only designs while recommending investment in basic pliers ($10-20) as the most practical approach.
FAQ 8: How Do I Create Matching Earring Pairs?
Provides eight techniques including reference systems, material preparation, specialized tools, and reframing slight variations as handcrafted authenticity.
FAQ 9: What’s the Safest Way to Dispose of Wire Scraps and Broken Beads?
Discusses responsible waste management: metal scrap recycling for wire, trash disposal for beads, and prevention strategies to minimize waste.
FAQ 10: Can Homemade Beaded Dangle Earrings Be Sold, and What Should I Price Them?
Covers business considerations including cost calculation, market research, and recommended pricing structure ($12-45 depending on materials and complexity).