The retro aging process of alloy jewelry is a technical process that uses chemical and physical methods to make new products show traces of time, which can give the alloy jewelry a unique retro beauty and historical charm. The following is a detailed process flow:
I. Preliminary preparation stage
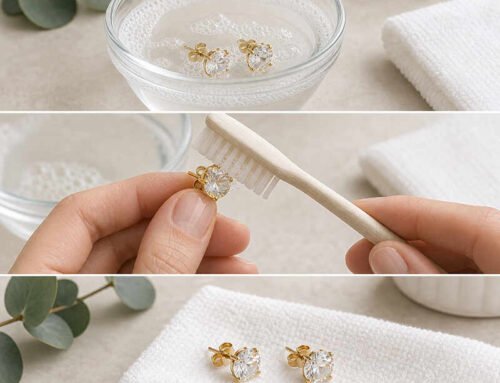
1. Jewelry cleaning
– Use an ultrasonic cleaner or special metal cleaner to remove oil, fingerprints and oxide layers on the surface of the jewelry
– Rinse with deionized water after cleaning to ensure that there is no residual detergent on the surface
– Wipe dry with a dust-free cloth or place in a drying oven at low temperature
2. Surface polishing
– For jewelry that needs to be partially aged, first use 600-800 grit sandpaper for light polishing
– Focus on polishing edges, corners and other easily worn parts to simulate natural use marks
– For jewelry that needs to be aged as a whole, use steel wool or abrasive sponge for uniform polishing
II. Chemical aging stage
1. Oxidation treatment
– Prepare potassium sulfide solution (usually 5-10% concentration) as an oxidant
– Immerse the jewelry completely in the solution for 30 seconds to 5 minutes (the time is adjusted according to the desired effect)
– Rinse with clean water after taking it out to neutralize the residual chemical agent
2. Rust effect production
– Use a special rust remover or homemade vinegar-salt solution (white vinegar and salt mixed in a ratio of 1:1)
– Use a brush or spray gun to apply to the parts that need to be rusted
– Leave it in an environment with a humidity of 60-70% for 2-4 hours to form natural rust spots
3. Patina effect treatment
– Use ammonia fumigation method: place the jewelry in a sealed container and place ammonia next to it
– After 24-48 hours, a natural patina effect can be formed
– Or use a patina chemical accelerator to apply directly
III. Physical aging stage
1. Mechanical wear treatment
– Use a vibration polisher to add steel balls or walnut shell particles for light polishing
– Manually hammer specific parts to create depressions
– Use a carving knife to add small scratches and wear marks
2. Layering treatment
– Use fine sandpaper to polish the high-raised parts for a second time to expose the underlying metal
– Keep the oxide layer in the depression to form a color contrast
– Use a hard brush to clean up excess oxide powder and highlight the texture
IV. Post-processing stage
1. Color fixation
– Spray or dip special metal protective paint (such as acrylic varnish)
– For the aged effect that needs to remain active, use microcrystalline wax for protection
– UV curing or natural drying for 24 hours
2. Artificial patina
– Wipe repeatedly with a cotton cloth dipped in a small amount of walnut oil or special patina oil
– Simulate the natural patina formed by human oil by touching
– Last for 1-2 weeks to form a warm luster
3. Quality inspection
– Check whether the aged effect is uniform and natural
– Test the adhesion and friction resistance of the protective layer
– Final cleaning and polishing
V. Special effect treatment (optional)
1. Inlay treatment
– Frost the edges of the inlaid gemstones or glass
– Add oxidation residues to the inlay gaps
2. Composite material treatment
– Dye and wear leather accessories
– Fading and edge wear of textile parts
3. Personalization
– Add wear in specific locations according to customer requirements
– Making antique inscriptions or marks
Through the above process, alloy jewelry can present different levels of vintage effects from a few years to centuries. Professional aging craftsmen will adjust the processing time and intensity of each link according to the design style and target age of the jewelry to ensure that each piece has a unique vintage charm and artistic value. It is worth noting that high-quality vintage aging treatment should simulate the natural aging process, avoid excessive artificial traces, and make the jewelry present a sense of history that can withstand scrutiny.